Texture Mapping
在计算机图形学中,纹理映射指的是给场景中的物体添加材质效果,这里的效果指的是一种或多种材质属性,例如颜色、光泽度、凹凸等。其中,定义出物体表面上每个点的颜色是最常用的一种纹理映射。只是在实操中,我们通常是根据给定点的位置,在纹理上查找对应的颜色值。
4.1 Constant Color Texture
在我们的工程中,我们为纹理创建一个单独的类。texture类的主要函数是value(),它会根据给定的纹理坐标返回颜色值。此外,我们还提供点的位置作为参数,原因将在后面解释。下面是texture类的代码:
1
2
3
4
5
6
7
8
9
10
11
12
13
14
#ifndef TEXTURE_H
#define TEXTURE_H

#include "rayTracing.h"

class texture
{
public:
    virtual ~texture() = default;

    virtual color value(double u, double v, const point3& p) const = 0;
};

#endif
我们会首先实现一个constant color纹理,它的颜色值是固定的,与纹理坐标无关:
1
2
3
4
5
6
7
8
9
10
11
12
13
14
15
class solidColor final : public texture
{
public:
    explicit solidColor(const color& albedo) : albedo(albedo) {}

    solidColor(double r, double g, double b) : solidColor(color(r, g, b)) {}

    color value(double u, double v, const point3& p) const override
    {
        return albedo;
    }

private:
    color albedo;
};
我们将纹理坐标存储在hitInfo中,当光线与表面相交时,hit()函数将会为我们计算出相交点出的纹理坐标:
1
2
3
4
5
6
7
8
9
10
11
12
class hitInfo
{
public:
    point3 position;
    vec3 normal;
    shared_ptr<material> material;
    double t;
    double u;
    double v;
    bool frontFace;
    ...
};
4.2 Solid Textures: A Checker Texture
solid/spatial纹理仅与点在三维空间中的位置有关,与点在物体上的位置无关,这也是为什么texture::value()中有一个point3的参数。checker纹理是一个很好的solid texture的例子,实现过程也相对简单,这里就不再解释代码了,我们只需要知道scaleInverse可以用来缩放纹理即可。
1
2
3
4
5
6
7
8
9
10
11
12
13
14
15
16
17
18
19
20
21
22
23
24
25
26
27
28
29
class checkerTexture final : public texture
{
public:
    checkerTexture(double scale, shared_ptr<texture> even, shared_ptr<texture> odd)
        : scaleInverse(1.0 / scale), even(std::move(even)), odd(std::move(odd)) {}

    checkerTexture(double scale, const color& color1, const color& color2)
        : scaleInverse(1.0 / scale),
          even(make_shared<solidColor>(color1)),
          odd(make_shared<solidColor>(color2))
    {}

    color value(double u, double v, const point3& p) const override
    {
        int xInteger = static_cast<int>(std::floor(scaleInverse * p.x()));
        int yInteger = static_cast<int>(std::floor(scaleInverse * p.y()));
        int zInteger = static_cast<int>(std::floor(scaleInverse * p.z()));

        bool isEven = (xInteger + yInteger + zInteger) % 2 == 0;

        return isEven ? even->value(u, v, p) : odd->value(u, v, p);
    }


private:
    double scaleInverse;
    shared_ptr<texture> even;
    shared_ptr<texture> odd;
};
现在,我们让lamberttian材质使用纹理而非颜色值:
1
2
3
4
5
6
7
8
9
10
11
12
13
14
15
16
17
18
19
20
21
22
23
24
25
26
class lambertian final : public material
{
public:
    lambertian(const color& albedo) : albedo(albedo) {}
    lambertian (const color& albedo) : tex(make_shared<solidColor>(albedo)) {}
    lambertian(shared_ptr<texture> tex) : tex(tex) {}

    bool scatter(const ray& rayIncoming, const hitInfo& info, color& attenuation, ray& rayScattered)
    const override
    {
        // we use lambertian distribution model to scatter rays
        vec3 direction =info.normal + randomVectorOnUnitSphere();
        // catch degenerate scatter direction
        if (direction.nearZero())
        {
            direction = info.normal;
        }
        rayScattered = ray(info.position, direction, rayIncoming.time());
        attenuation = tex->value(info.u, info.v, info.position);
        return true;
    }

private:
    color albedo;
    shared_ptr<texture> tex;
};
现在,我们可以将主场景中的“地面”的材质改为棋盘纹理:
1
2
3
4
5
6
7
8
9
10
11
12
13
14
15
16
17
18
19
20
#include "rayTracing.h"

#include "bvh.h"
#include "camera.h"
#include "hittable.h"
#include "hittableList.h"
#include "material.h"
#include "sphere.h"
#include "texture.h"

int main() {

    hittableList world;

    auto checker = make_shared<checkerTexture>(0.32, color(0.2, 0.3, 0.1), color(0.9, 0.9, 0.9));
    world.add(make_shared<sphere>(point3(0,-1000,0), 1000, make_shared<lambertian>(checker)));

    ...
}
渲染中。。
4.3 Rendering The Solid Checker Texture
这一小节主要是调整main函数,在光线追踪器中,我们会想要测试不同的场景,我们可以将当前的场景从main函数中独立出来:
1
2
3
4
5
6
7
8
9
10
11
12
13
14
15
16
17
18
19
20
21
22
23
24
25
26
27
#include "rayTracing.h"

#include "bvh.h"
#include "camera.h"
#include "hittable.h"
#include "hittableList.h"
#include "material.h"
#include "sphere.h"
#include "texture.h"

int main()
void bouncingSphere() {

    hittableList world;

    auto checker = make_shared<checkerTexture>(0.32, color(0.2, 0.3, 0.1), color(0.9, 0.9, 0.9));
    world.add(make_shared<sphere>(point3(0,-1000,0), 1000, make_shared<lambertian>(checker)));

    ...

    cam.render(world);
}

int main()
{
    bouncingSphere();
}
接下来,我们新增一个测试场景,并使用switch语句来指定想要渲染的场景:
1
2
3
4
5
6
7
8
9
10
11
12
13
14
15
16
17
18
19
20
21
22
23
24
25
26
27
28
29
30
31
32
33
34
35
36
37
38
39
40
41
42
43
44
45
46
47
48
49
50
#include "rayTracing.h"

#include "bvh.h"
#include "camera.h"
#include "hittable.h"
#include "hittableList.h"
#include "material.h"
#include "sphere.h"
#include "texture.h"

void bouncingSphere()
{
    ...
}

void checkeredSphere()
{
    hittableList world;

    auto checker = make_shared<checkerTexture>(0.32, color(.2, .3, .1), color(.9, .9, .9));

    world.add(make_shared<sphere>(point3(0,-10, 0), 10, make_shared<lambertian>(checker)));
    world.add(make_shared<sphere>(point3(0, 10, 0), 10, make_shared<lambertian>(checker)));

    camera cam;

    cam.aspectRatio      = 16.0 / 9.0;
    cam.imageWidth       = 400;
    cam.samplesPerPixel = 100;
    cam.maxDepth         = 50;

    cam.verticalFOV = 20;
    cam.lookFrom = point3(13,2,3);
    cam.lookAt = point3(0,0,0);
    cam.viewUp = vec3(0,1,0);

    cam.defocusAngle = 0;

    cam.render(world);
}

int main()
{
    switch (2)
    {
        case 1: bouncingSphere(); break;
        case 2: checkeredSphere(); break;
        default: ;
    }
}
渲染中。。。
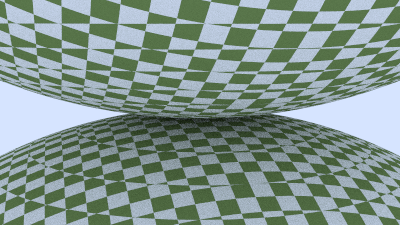
看起来表面有些奇怪,这是因为checker纹理基于点在三维空间中的位置,接下来,我们将引入球体的纹理坐标,就可以从某种程度解决这个问题。
4.4 Texture Coordinates for Spheres
1
2
3
4
5
6
7
8
9
10
11
12
13
14
15
16
17
18
19
20
21
22
23
class sphere final : public hittable
{
...

private:
    ...

    static void getSphereUV(const point3& p, double& u, double& v)
    {
        // p: a given point on the sphere of radius one, centered at the origin.
        // u: returned value [0,1] of angle around the Y axis from X=-1.
        // v: returned value [0,1] of angle from Y=-1 to Y=+1.
        //     <1 0 0> yields <0.50 0.50>       <-1  0  0> yields <0.00 0.50>
        //     <0 1 0> yields <0.50 1.00>       < 0 -1  0> yields <0.50 0.00>
        //     <0 0 1> yields <0.25 0.50>       < 0  0 -1> yields <0.75 0.50>

        double theta = acos(-p.y());
        double phi = atan2(-p.z(), p.x()) + pi;

        u = phi / (2 * pi);
        v = theta / pi;
    }
};
然后我们更新sphere::hit(),从而根据光线与球体的相交点计算出uv:
1
2
3
4
5
6
7
8
9
10
11
12
13
14
15
16
17
18
19
20
21
22
23
24
class sphere final : public hittable
{
public:
    ...

    bool hit(const ray& r, interval tInterval, hitInfo& info) const override
    {
        ...

        info.position = r.at(root);
        vec3 outsideNormal = (info.position - initialCenter) / radius;
        info.setNormalDirection(r, outsideNormal);
        getSphereUV(outsideNormal, info.u, info.v);
        info.material = material;
        info.t = root;

        return true;
    }

    ...

private:
    ...
};
4.5 Accessing Texture Image Data
现在,让我们为渲染器引入图片。stb_image能够读取图片数据并存储在一个32位浮点数组中,其中RGB分量的范围为[0, 1]。需要注意的是,图片是在线性颜色空间中被导入的,我们的渲染器也是在限行颜色空间中进行所有计算的。
我们将stb_image放在external文件夹中,并实现一个rtw_image类,其中我们可以使用函数pixelData(int x, int y)为每个像素获取一个8位的RGB值。
1
2
3
4
5
6
7
8
9
10
11
12
13
14
15
16
17
18
19
20
21
22
23
24
25
26
27
28
29
30
31
32
33
34
35
36
37
38
39
40
41
42
43
44
45
46
47
48
49
50
51
52
53
54
55
56
57
58
59
60
61
62
63
64
65
66
67
68
69
70
71
72
73
74
75
76
77
78
79
80
81
82
83
84
85
86
87
88
89
90
91
92
93
94
95
96
97
98
99
100
101
102
103
104
105
106
107
108
109
110
111
112
113
114
115
116
117
118
119
120
121
122
123
124
125
126
127
128
#ifndef RTW_STB_IMAGE_H
#define RTW_STB_IMAGE_H

// Disable strict warnings for this header from the Microsoft Visual C++ compiler.
#ifdef _MSC_VER
    #pragma warning (push, 0)
	#pragma warning(disable: 4996)
#endif

#define STB_IMAGE_IMPLEMENTATION
#define STBI_FAILURE_USERMSG

#include "external/stb_image.h"

#include <cstdlib>
#include <iostream>

class rtw_image {
  public:
    rtw_image() {}

    rtw_image(const char* image_filename) {
        // Loads image data from the specified file. If the RTW_IMAGES environment variable is
        // defined, looks only in that directory for the image file. If the image was not found,
        // searches for the specified image file first from the current directory, then in the
        // images/ subdirectory, then the _parent's_ images/ subdirectory, and then _that_
        // parent, on so on, for six levels up. If the image was not loaded successfully,
        // width() and height() will return 0.

        auto filename = std::string(image_filename);
        auto imagedir = getenv("RTW_IMAGES");

        // Hunt for the image file in some likely locations.
        if (imagedir && load(std::string(imagedir) + "/" + image_filename)) return;
        if (load(filename)) return;
        if (load("images/" + filename)) return;
        if (load("../images/" + filename)) return;
        if (load("../../images/" + filename)) return;
        if (load("../../../images/" + filename)) return;
        if (load("../../../../images/" + filename)) return;
        if (load("../../../../../images/" + filename)) return;
        if (load("../../../../../../images/" + filename)) return;

        std::cerr << "ERROR: Could not load image file '" << image_filename << "'.\n";
    }

    ~rtw_image() {
        delete[] bdata;
        STBI_FREE(fdata);
    }

    bool load(const std::string& filename) {
        // Loads the linear (gamma=1) image data from the given file name. Returns true if the
        // load succeeded. The resulting data buffer contains the three [0.0, 1.0]
        // floating-point values for the first pixel (red, then green, then blue). Pixels are
        // contiguous, going left to right for the width of the image, followed by the next row
        // below, for the full height of the image.

        auto n = bytes_per_pixel; // Dummy out parameter: original components per pixel
        fdata = stbi_loadf(filename.c_str(), &image_width, &image_height, &n, bytes_per_pixel);
        if (fdata == nullptr) return false;

        bytes_per_scanline = image_width * bytes_per_pixel;
        convert_to_bytes();
        return true;
    }

    int width()  const { return (fdata == nullptr) ? 0 : image_width; }
    int height() const { return (fdata == nullptr) ? 0 : image_height; }

    const unsigned char* pixel_data(int x, int y) const {
        // Return the address of the three RGB bytes of the pixel at x,y. If there is no image
        // data, returns magenta.
        static unsigned char magenta[] = { 255, 0, 255 };
        if (bdata == nullptr) return magenta;

        x = clamp(x, 0, image_width);
        y = clamp(y, 0, image_height);

        return bdata + y*bytes_per_scanline + x*bytes_per_pixel;
    }

  private:
    const int      bytes_per_pixel = 3;
    float         *fdata = nullptr;         // Linear floating point pixel data
    unsigned char *bdata = nullptr;         // Linear 8-bit pixel data
    int            image_width = 0;         // Loaded image width
    int            image_height = 0;        // Loaded image height
    int            bytes_per_scanline = 0;

    static int clamp(int x, int low, int high) {
        // Return the value clamped to the range [low, high).
        if (x < low) return low;
        if (x < high) return x;
        return high - 1;
    }

    static unsigned char float_to_byte(float value) {
        if (value <= 0.0)
            return 0;
        if (1.0 <= value)
            return 255;
        return static_cast< unsigned char >(256.0 * value);
    }

    void convert_to_bytes() {
        // Convert the linear floating point pixel data to bytes, storing the resulting byte
        // data in the `bdata` member.

        int total_bytes = image_width * image_height * bytes_per_pixel;
        bdata = new unsigned char[total_bytes];

        // Iterate through all pixel components, converting from [0.0, 1.0] float values to
        // unsigned [0, 255] byte values.

        auto *bptr = bdata;
        auto *fptr = fdata;
        for (auto i=0; i < total_bytes; i++, fptr++, bptr++)
            *bptr = float_to_byte(*fptr);
    }
};

// Restore MSVC compiler warnings
#ifdef _MSC_VER
    #pragma warning (pop)
#endif

#endif
然后我们就可以新建imageTexture类了:
1
2
3
4
5
6
7
8
9
10
11
12
13
14
15
16
17
18
19
20
21
22
23
24
25
26
27
28
29
30
31
32
33
#include "rayTracing.h"

#include "rtw_stb_image.h"

...

class checkerTexture final : public texture {...}

class imageTexture final : public texture
{
public:
    explicit imageTexture(const char* fileName) : image(fileName) {}

    color value(double u, double v, const point3& p) const override
    {
        // if we have no texture data. then return solid magenta as debugging aid
        if (image.height() <= 0) return color(1, 0, 1);

        // clamp input texture coordinates to [0, 1] x [1, 0]
        u = interval(0, 1).clamp(u);
        v = 1.0 - interval(0, 1).clamp(v); // flip V to image coordinates

        int i = static_cast<int>(u * image.width());
        int j = static_cast<int>(v * image.height());
        const unsigned char* pixel = image.pixel_data(i, j);

        double colorScale = 1.0 / 255.0;
        return {colorScale * pixel[0], colorScale * pixel[1], colorScale * pixel[2]};
    }

private:
    rtw_image image;
};
4.6 Rendering The Image Texture
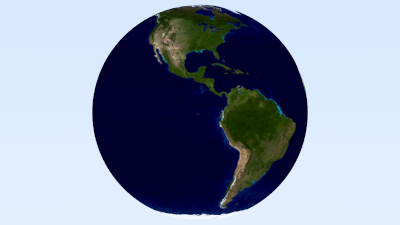
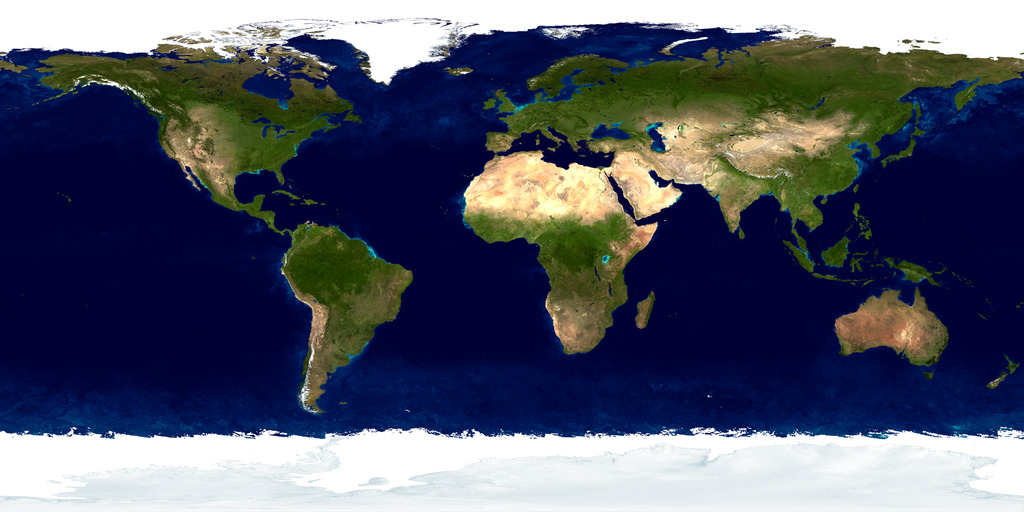
在本章最后,我们使用下面这个贴图在场景中绘制一个“地球”:
1
2
3
4
5
6
7
8
9
10
11
12
13
14
15
16
17
18
19
20
21
22
23
24
25
26
27
28
29
30
31
32
33
void earth()
{
    auto earthTexture = make_shared<imageTexture>("../images/earthmap.jpg");
    auto earthMaterial = make_shared<lambertian>(earthTexture);
    auto earthSphere = make_shared<sphere>(point3(0, 0, 0), 2, earthMaterial);

    camera cam;

    cam.aspectRatio      = 16.0 / 9.0;
    cam.imageWidth       = 400;
    cam.samplesPerPixel = 100;
    cam.maxDepth         = 50;

    cam.verticalFOV = 20;
    cam.lookFrom = point3(0, 0, 12);
    cam.lookAt = point3(0, 0, 0);
    cam.viewUp = vec3(0,1,0);

    cam.defocusAngle = 0;

    cam.render(hittableList(earthSphere));
}

int main()
{
    switch (3)
    {
        case 1: bouncingSphere(); break;
        case 2: checkeredSphere(); break;
        case 3: earth(); break;
        default: ;
    }
}
渲染中。。。