Rays, a Simple Camera, and Background
4.1 The ray Class
所有的光线追踪器都有一个ray类,并且会计算沿着光线会看到的颜色。我们可以把光线理解为一个函数P(t) = A + tb,其中P是三维空间中线上的一点,A是光线原点,b是光线方向,t是一个实数参数,在程序中对应的数值类型是double。通过改变t的值,我们可以得到直线上任意位置。如果我们限定t是正数,则函数表示的概念就是我们所说的half-line或ray。

我们创建一个新的类ray,另外将函数P(t)在代码中命名为ray::at(t):
1
2
3
4
5
6
7
8
9
10
11
12
13
14
15
16
17
18
19
20
21
22
#ifndef RAY_H
#define RAY_H

#include "vec3.h"

class ray
{
public:
    ray() {}
    ray(const point3& origin, const vec3& direction) : orig(origin), dir(direction) {}

    const point3& origin() const {return orig;}
    const vec3& direction() const {return dir;}

    point3 at(double t) const {return orig + dir * t;}

private:
    point3 orig;
    vec3 dir;
};

#endif
4.2 Sending Rays Into the Scene
光线追踪器的核心是穿过像素向场景中发送光线,然后计算光线方向上看到的颜色。涉及的步骤包括:
- 计算从“眼睛”穿过像素的光线
- 判断哪些物体与光线相交
- 计算最近相交点处的颜色值。
光线是从相机中发射的,所以我们的光线追踪器从构建一个简单相机开始。为了最终生成一个矩形的图片,我们选择16:9这种常见的纵横比aspect ratio。这样一来,我们只需要设置好图片的理想宽度,再根据纵横比计算出图片高度即可。需要注意的是,我们务必要确保图片的高度不小于1。
除了设置图片的像素尺寸外,我们还需要构建一个viewport,它是三维空间中的一个虚拟矩形,包含了图片上所有的pixel grid。如果像素之间的间距在水平方向和竖直方向上是一致的,那么将像素包围起来的视口将具有与渲染图像相同的纵横比。视口的大小我们通常不做限制,只要符合图片的纵横比即可。同时,我们将两个相邻像素之间的距离称为像素间距pixel spacing,并且我们设定:图像中的像素都是正方形的标准像素。
在下面这段代码中,我们设定视口的高度为2.0,然后再根据图像纵横比求出视口的宽度:
1
2
3
4
5
6
7
8
double aspectRatio = 16.0 / 9.0;
int imageWidth = 400;

int imageHeight = int (imageWidth / aspectRatio);
imageHeight = (imageHeight) < 1 ? 1 : imageHeight;

double viewportHeight = 2.0;
double viewportWidth = double(imageWidth) / imageHeight * viewportHeight;
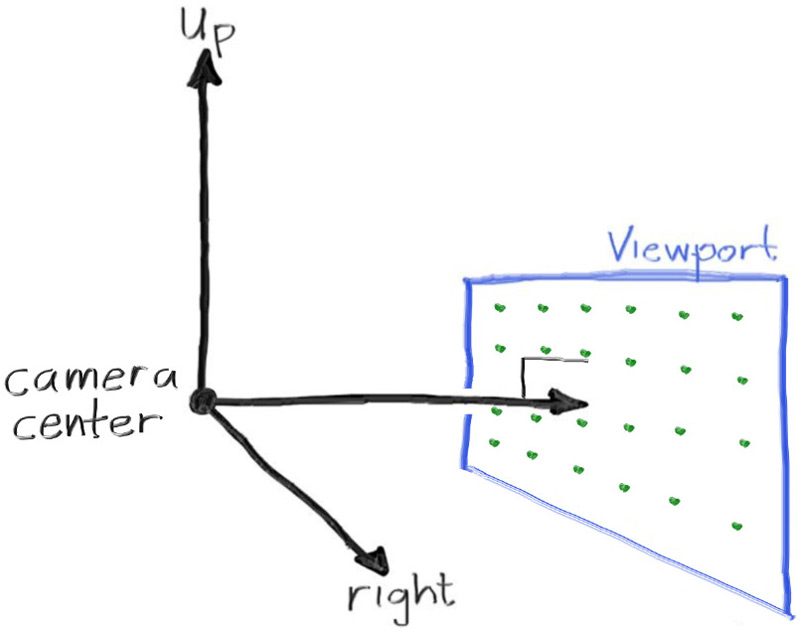
接下来,我们还需要定义出相机中心点这个概念:相机中心是三维空间中的一个点,所有的场景光线都会从该点开始(通常也会被称为眼睛eye)。从相机中心到视口中心的向量与视口正交,相机中心到视口中心之间的距离被称其为焦距focal length,当前我们先设置焦距为1。
出于简化的目的,我们可以将相机放在世界坐标的原点上,同时设置y轴指向上方,x轴指向右方,相机朝向Z-方向。这种设置符合右手坐标系的设定,如下图所示:
相机使用的是右手坐标系,但这个设定与我们图像的坐标是冲突的。在图像中,第一个像素在左上角,最后一个像素在右下角,图像的Y轴是从上指向下的,与相机Y轴的指向相反。
当扫描图像时,我们从左上角的像素开始,每行从左向右扫描,然后再逐行从上到下扫描。由此,我们可以在视口中使用两个向量Vu和Vy,分别代表图像水平轴向与竖直轴向,如下图所示:
![]()
我们已经有了理论基础了,现在我们可以在main函数中构建相机,然后通过ray_color(const ray& r)返回场景中每条光线对应的颜色值,暂时先设置为黑色。下面是我们在加入相机后重构的main.cpp:
1
2
3
4
5
6
7
8
9
10
11
12
13
14
15
16
17
18
19
20
21
22
23
24
25
26
27
28
29
30
31
32
33
34
35
36
37
38
39
40
41
42
43
44
45
46
47
48
49
50
51
52
53
54
55
56
57
58
59
60
#include <iostream>

#include "vec3.h"
#include "color.h"
#include "ray.h"

color rayColor(const ray& r)
{
	return color(0, 0, 0);
}

int main()
{
	// Image------------------------------------------------------------
	double aspectRatio = 16.0 / 9.0;
	int imageWidth = 400;
	int imageHeight = int (imageWidth / aspectRatio);
	imageHeight = (imageHeight) < 1 ? 1 : imageHeight;

	// Camera & Viewport------------------------------------------------
	double focalLength = 1.0;
	double viewportHeight = 2.0;
	double viewportWidth = double(imageWidth) / imageHeight * viewportHeight;
	point3 cameraCenter = point3(0, 0, 0);

	// calculate the vectors across the horizontal and down the viewport edges
	vec3 viewportU = vec3(viewportWidth, 0, 0);
	vec3 viewportV = vec3(0, -viewportHeight, 0);

	// calculate the horizontal and vertical delta vectors from pixel to pixel
	vec3 pixelDeltaU = viewportU / imageWidth;
	vec3 pixelDeltaV = viewportV / imageHeight;

	// calculate the location of the upper left pixel
	point3 viewportUpperLeft = cameraCenter - vec3(0, 0, focalLength) - viewportU / 2 - viewportV / 2;
	point3 firstPixelLocation = viewportUpperLeft + 0.5 *( pixelDeltaU + pixelDeltaV);


	// Render--------------------------------------------------------
	std::cout << "P3\n" << imageWidth << ' ' << imageHeight << "\n255\n";

	for (int j = 0; j < imageHeight; j++)
	{
		std::clog << "rScanlines remaining: " << (imageHeight - j) << "\n" << std::flush;

		for (int i = 0; i < imageWidth; i++)
		{
			point3 pixelCenter = firstPixelLocation + i * pixelDeltaU + j * pixelDeltaV;
			vec3 rayDirection = pixelCenter - cameraCenter;
			ray r = ray(cameraCenter, rayDirection);

			vec3 currentPixelColor = rayColor(r);
			writeColor(std::cout, currentPixelColor);
		}
	}

	std::clog << "rDone.              \n";

	return 0;
}
最后,我们让函数ray_color()返回一个渐变的颜色值,它会根据y值在白色与蓝色之间插值:
1
2
3
4
5
6
color rayColor(const ray& r)
{
	vec3 unitDirection = unitVectorLength(r.direction());
	double t = (unitDirection.y() + 1.0) * 0.5;
	return color(1.0, 1.0, 1.0) * (1 - t) + color(0.5, 0.7, 1.0) * t;
}
得到结果是这样的,我们就用它作为场景的天空背景: