Output An Image
Output An Image
2.1 The PPM Image Format
在本系列博客中,我们使用PPM图像格式作为渲染结果的存储形式。下图给出了PPM格式的简要描述:
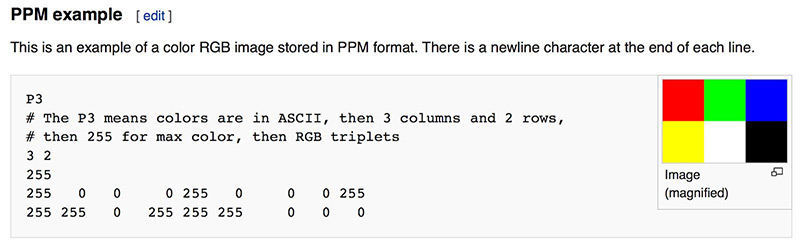
下面这段C++代码可以输出一个PPM格式的图片:
1
2
3
4
5
6
7
8
9
10
11
12
13
14
15
16
17
18
19
20
21
22
23
24
#include <iostream>

int main()
{
    // Image
    int imageWidth = 256;
    int imageHeight = 256;

    // Render
    std::cout << "P3\n" << imageWidth << ' ' << imageHeight << "\n255\n";
    for (int j = 0; j < imageHeight; j++)
    {
        for (int i = 0; i < imageWidth; i++)
        {
            double r = double(i) / (imageWidth - 1);
            double g = double(j) / (imageHeight - 1);

            int pixelR = int(255.999 * r);
            int pixelG = int (255.999 * g);

            std::cout << pixelR << ' ' << pixelG << ' ' << "0\n";
        }
    }
}
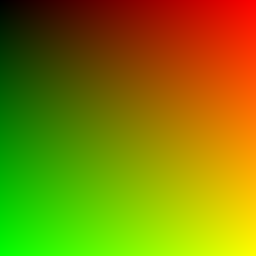
这段代码中,像素按照从左到右、从上之下的顺序绘制。 此外,在这个PPM图片中,红色的亮度值从最左边的0变为最右边的1,绿色的亮度值从最上面的0变为最下面的1,所以也不难推测图片的右下角应该呈现黄色。
2.2 Creating an Image File
当前文件被写进了standard output stream中,我们需要将其重定向到图片文件中,通常,我们会从命令行中使用>重定向操作符来完成。最终我们得到的第一个PPM图片如下图所示:
2.3 Adding a Progress Indicator
对于较长时间的渲染来说,我们最好可以追踪渲染的进度:
1
2
3
4
5
6
7
8
9
10
11
12
13
14
15
16
17
18
19
20
21
22
23
24
25
26
27
#include <iostream>

int main()
{
    // Image
    int imageWidth = 256;
    int imageHeight = 256;

    // Render
    std::cout << "P3\n" << imageWidth << ' ' << imageHeight << "\n255\n";
    for (int j = 0; j < imageHeight; j++)
    {
        std::clog << "rScanlines remaining: " << (imageHeight - j) << "\n" << std::flush;
        for (int i = 0; i < imageWidth; i++)
        {
            double r = double(i) / (imageWidth - 1);
            double g = double(j) / (imageHeight - 1);

            int pixelR = int(255.999 * r);
            int pixelG = int (255.999 * g);

            std::cout << pixelR << ' ' << pixelG << ' ' << "0\n";
        }
    }

    std::clog << "rDone.              \n";
}
本文由作者按照 CC BY 4.0 进行授权