Lights
Lights
光照是光线追踪的关键组件,早期的光线追踪器主要是用抽象的光源,比如空间中的一个点或方向。而现代光线追踪器更多地使用基于物理的光照,这些光源不仅有位置,还有大小。
7.1
首先我们来创建一个没有反射的自发光材质,并添加一个对应的emitted()函数,用于告诉光线这个材质是什么颜色的,原理类似于渲染器中的背景色,所以代码很简单:
1
2
3
4
5
6
7
8
9
10
11
12
13
14
class diffuseLight final : public material
{
public:
    explicit diffuseLight(shared_ptr<texture> texture) : texture(std::move(texture)) {}
    explicit diffuseLight(const color& emitColor) : texture(make_shared<solidColor>(emitColor)) {}

    color emitted(double u, double v, const point3& p) const override
    {
        return texture->value(u, v, p);
    }

private:
    shared_ptr<texture> texture;
};
需要注意的是,diffuseLight::emitted()是override函数,所以我们还需要在基类material中添加对应的函数,只是目前只有diffuseLight材质具有自发光的性质,所以我们让material::emitted()简单返回一个零的颜色值即可:
1
2
3
4
5
6
7
8
9
10
11
12
13
14
15
class material
{
public:
    virtual ~material() = default;

    virtual color emitted(double u, double v, const point3& p) const
    {
        return {0, 0, 0};
    }

    virtual bool scatter(const ray& rayIncoming, const hitInfo& info, color& attenuation, ray& rayScattered) const
    {
        return false;
    }
};
7.2 Adding Background Color to the Ray Color Function
此前我们一直使用蓝色与白色之间的渐变作为场景中的背景与照明来源。如果我们构建了一个纯黑的背景,这样场景中所有的光照都只会来自于光源。所以,我们需要给相机添加一个background的参数,当场景中的光线没有击中任何物体时,就返回背景色。
这样一来,当我们想要计算光源与物体相交点处的颜色值,我们需要计算相交点出物体的散射光线的颜色值以及光源(也就是当前的自发光材质)的颜色值:
1
2
3
4
5
6
7
8
9
10
11
12
13
14
15
16
17
18
19
20
21
22
23
24
25
26
27
28
29
30
31
32
33
34
35
36
37
38
39
40
41
class camera
{
public:
    double aspectRatio = 1.0;   // ratio of image width over height
    int imageWidth = 100;       // rendered image width in pixel count
    int samplesPerPixel = 10;   // count of random samples for each pixel
    int maxDepth = 10;          // maximum number of ray bounces into scene
    color background;           // scene background color

    ...

private:
    ...

    color rayColor(const ray& rayIncoming, int depth, const hittable& world)
    {
        // if we've exceeded the ray bounce limit, no more light is gathered
        if (depth <= 0) { return {0.0, 0.0, 0.0};}

        hitInfo info;
        // if the ray hits nothing, just return the background color
        if (!world.hit(rayIncoming, interval(0.001, infinity), info))
        {
            return background;
        }

        ray rayScattered;
        color attenuation;
        color colorFromEmission = info.material->emitted(info.u, info.v, info.position);

        // if current hit point belongs to a emission material, just return emission color
        if(!info.material->scatter(rayIncoming, info, attenuation, rayScattered))
        {
            return colorFromEmission;
        }

        color colorFromScatter = attenuation * rayColor(rayScattered, depth - 1, world);

        return colorFromEmission + colorFromScatter;
    }
};
由于我们为camera新增了public成员变量,我们需要修改main函数中的所有测试场景的相机配置:
1
cam.background = color(0.7, 0.8, 1.00);
7.3 Turning Objects into Lights
现在,我们来尝试构建一个使用自发光材质的、可以作为光源的矩形:
1
2
3
4
5
6
7
8
9
10
11
12
13
14
15
16
17
18
19
20
21
22
23
24
25
26
27
28
29
30
31
32
33
34
35
36
37
38
39
40
41
42
void simpleLight()
{
    hittableList world;

    shared_ptr<noiseTexture> perlinNoise = make_shared<noiseTexture>(4);
    world.add(make_shared<sphere>(point3(0,-1000,0), 1000, make_shared<lambertian>(perlinNoise)));
    world.add(make_shared<sphere>(point3(0,2,0), 2, make_shared<lambertian>(perlinNoise)));

    shared_ptr<diffuseLight> diffLight = make_shared<diffuseLight>(color(4, 4, 4));
    world.add(make_shared<quad>(point3(3,1,-2), vec3(2,0,0), vec3(0,2,0), diffLight));

    camera cam;

    cam.aspectRatio      = 16.0 / 9.0;
    cam.imageWidth       = 400;
    cam.samplesPerPixel = 100;
    cam.maxDepth         = 50;
    cam.background = color(0, 0, 0);

    cam.verticalFOV = 20;
    cam.lookFrom = point3(26, 3, 6);
    cam.lookAt = point3(0, 2, 0);
    cam.viewUp = vec3(0,1,0);

    cam.defocusAngle = 0;

    cam.render(world);
}

int main()
{
    switch (6)
    {
        case 1: bouncingSphere(); break;
        case 2: checkeredSphere(); break;
        case 3: earth(); break;
        case 4: perlinSpheres(); break;
        case 5: quads(); break;
        case 6: simpleLight(); break;
        default: ;
    }
}
渲染中。。。
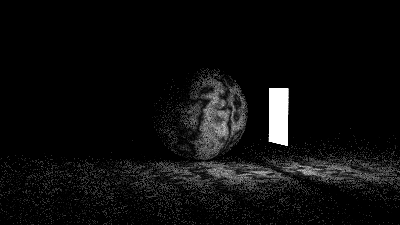
我们可以留意到,灯光的亮度高于(1, 1, 1),这是的它足以照亮场景中的其他物体。
7.4 Creating an Empty “Cornell Box”
终于到了经典的“康奈尔盒”时间了,它用于模拟漫反射物质之间的光相互作用
1
2
3
4
5
6
7
8
9
10
11
12
13
14
15
16
17
18
19
20
21
22
23
24
25
26
27
28
29
30
31
32
33
34
35
36
37
38
39
40
41
42
43
44
45
46
47
48
void cornellBox()
{
    hittableList world;

    auto red   = make_shared<lambertian>(color(.65, .05, .05));
    auto white = make_shared<lambertian>(color(.73, .73, .73));
    auto green = make_shared<lambertian>(color(.12, .45, .15));
    auto light = make_shared<diffuseLight>(color(15, 15, 15));

    world.add(make_shared<quad>(point3(555,0,0), vec3(0,555,0), vec3(0,0,555), green));
    world.add(make_shared<quad>(point3(0,0,0), vec3(0,555,0), vec3(0,0,555), red));
    world.add(make_shared<quad>(point3(343, 554, 332), vec3(-130,0,0), vec3(0,0,-105), light));
    world.add(make_shared<quad>(point3(0,0,0), vec3(555,0,0), vec3(0,0,555), white));
    world.add(make_shared<quad>(point3(555,555,555), vec3(-555,0,0), vec3(0,0,-555), white));
    world.add(make_shared<quad>(point3(0,0,555), vec3(555,0,0), vec3(0,555,0), white));

    camera cam;

    cam.aspectRatio      = 1.0;
    cam.imageWidth       = 600;
    cam.samplesPerPixel = 200;
    cam.maxDepth         = 50;
    cam.background = color(0, 0, 0);

    cam.verticalFOV = 40;
    cam.lookFrom = point3(278, 278, -800);
    cam.lookAt = point3(278, 278, 0);
    cam.viewUp = vec3(0,1,0);

    cam.defocusAngle = 0;

    cam.render(world);
}

int main()
{
    switch (7)
    {
        case 1: bouncingSphere(); break;
        case 2: checkeredSphere(); break;
        case 3: earth(); break;
        case 4: perlinSpheres(); break;
        case 5: quads(); break;
        case 6: simpleLight(); break;
        case 7: cornellBox(); break;
        default: ;
    }
}
渲染中。。。
![]()
我们可以看到图像中有相当多的噪点,这是因为光源太小,以至于大多数的随机光线无法与光源相交。
本文由作者按照 CC BY 4.0 进行授权